Sunday, September 11, 2011

Outlook Error: “An OLE registration error occurred. The program is not correctly installed…”

Microsoft Word is set to be your e-mail editor. However, Word is unavailable, not installed, or is not the same version as Outlook. The Outlook e-mail editor will be used instead. "An OLE registration error occurred. The program is not correctly installed. Run setup again for the program".

To try to fix this problem, perform the following steps.
  1. Click Start > Run or hold down the Windows Key and press R.
  2. Type regsvr32 ole32.dll and click OK.
You should get a response the the registration succeeded. Click OK and try Outlook again.

Thursday, February 10, 2011

Installing Active Directory Tools Under Windows 7

First of all you need to download the software from Microsoft. In the Microsoft Download Centre these are called "Remote Server Administration Tools for Windows 7" a direct link to the download page is available;
If you scroll down to the "Files in This Download" section of the page you'll see two files. Depending on whether or not you're running 32-bit or 64-bit Windows 7 you need to pick the correct file. If you're unsure of which version you're running then go to the start button, right-click "Computer" and then select "Properties". You'll see something like this;
Look at the "System type:" value and you'll see what version of Windows you're running.
If you're running 32-bit then you need to download the file which starts "x86..." (currently this is "x86fre_GRMRSAT_MSU.msu" but it might change). For 64-bit users you need to download the file which begins "amd64..." (currently this is "amd64fre_GRMRSATX_MSU.msu") - this is true even if you're running a non-AMD 64-bit processor. The reason for this I'll leave Microsoft to explain ...
Once you've got the file install it (it's a standard KB update file).
After it's been successfully installed go to the Start Menu > Control Panel and select "Programs";
The "Windows Features" dialog box will be displayed, scroll down to "Role Administration Tools" (under "Remote Server Administration Tools") and select the the following items;
Click "OK" to make the changes.
In order to make finding these under the Start Menu a little easier right-click the Start Button and select "Properties";
Select "Customize ..." and then scroll down the list until you see "System administrative tools" and choose where you want the tools to display;
Under the Start Menu you will now see an "Administrative Tools" option, under this you'll see the new AD Tools;
NOTE: Sometimes a reboot is required to pick up these changes!

--->

Thursday, September 23, 2010

Sharepoint error when trying to edit a list using the Edit function in Datasheet

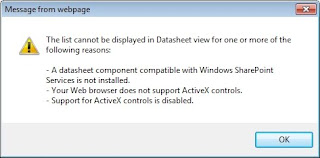
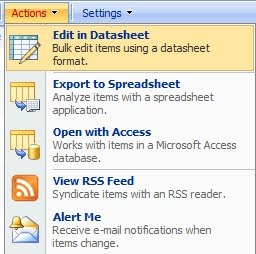
If you have installed the 64-bit new version of Microsoft Office, Office 2010, then you will most likely see the following message when trying to edit a SharePoint list using the Edit in datasheet function:

The list cannot be displayed in Datasheet view for one or more of the following reasons:

- A datasheet component compatible with Windows SharePoint Services is not installed.

- Your Web browser does not support ActiveX controls

- Support for AxtiveX controls is disabled


The issue revolves around the fact that 64-bit versions of Office 2010 do not ship with the 32-bit Activex control that would make the datasheet option work with Internet Explorer.

There are ways to make this work, and the usual suggestion is to find a copy of an Office 2007 product and either install it (such as SharePoint Designer 2007) or just choose to install the Windows SharePoint Services components of the product. This works, but I don't really want to go to that much trouble.
Another solution, and the one that I employed, is to install the 2007 Office System Driver: Data Connectivity Components. After installing the Components, go back to the menu and the datasheet option will work great.


Another solution, is to install the 2007 Office System Driver: Data Connectivity Components
<http://www.microsoft.com/downloads/details.aspx?familyid=7554F536-8C28-
4598-9B72-EF94E038C891&displaylang=en> . After installing the Components, go back to the menu and the datasheet option will work great.

Excerpts from:
-->
-->


Wednesday, September 1, 2010

How to lock computer in Remote Desktop Connection?

It is quite easy to do that. Simply create shortcut as follow.

  • Right click on the Desktop
  • Choose New –>> Shortcuts
  • And then in the dialog box type the following


rundll32 user32.dll,LockWorkStation

After that give the shortcut whatever name you like. Next time, when you want to lock your computer, simply double click on that shortcut and it’s all set!!!

---->>


Monday, August 23, 2010

IE Error: This Page Has Been Modified to Prevent Cross Site Scripting

In IE, click Tools -> Internet Options -> Click the Security Tab -> Click the "Custom Level" button -> Scroll towards the bottom until you see "XSS Filter". Click Disable. Click ok, and ok again. You may need to restart your browser. You can always turn it back on by doing these steps again and simply clicking Enable.

More info about this IE Error

Tuesday, July 6, 2010

The Recycle Bin on C:\ is Corrupted. Do you want to empty the Recycle Bin for this drive?

This worked for WINDOWS 7 Machines.

Go to Command Prompt:

C:\>rd /s c:\$Recycle.Bin
C:\$Recycle.Bin, Are you sure (Y/N)? --> Y (hit enter)
C:\>


then reboot, Windows automatically makes a new empty recycle bin:

for those with other OS's you need to know the name of you recycle bin it could be recycled or recycler check your properties tab for the recyle bin folder for the folder name then go to command prompt and just substitute the correct name

i.e.
C:\>rd /s c:\recycler
C:\recycler, Are you sure (Y/N)? y
or C:\>rd /s c:\recycled
C:\recycled, Are you sure (Y/N)? y


if you type in the wrong name you will get "The system cannot find the file specified."
then you need to go back and find out for sure what your folder name is.


NOTE OF WARNING: if you do this everthing in your recycle bin will be deleted permantly


Thursday, June 24, 2010

Network printer is showing offline and is not printing

This issue occurs if the printer spooler is corrupt. Please follow the steps below to reset the spooler.


Reset Spooler

  1. Click Start, click Run, type "Services.msc" (without the quotation marks) in the open box and click OK.
  2. Double-click "Printer Spooler" in the Services list.
  3. Click Stop and click OK.
  4. Click Start, click Run, type "%WINDIR%\system32\spool\printers" in the open window, and delete all files in this folder.
  5. Click Start, click Run, type "Services.msc" (without the quotation marks) in the open box.

Another possible cause is your security programs. They may block the some ports that you are using to communicate with the printer. I suggest that you temporary disable all of them and then check the result again.


social.technet.microsoft.com


Monday, June 21, 2010

How to Manually Start OST Compaction

Method 1: Microsoft Office Outlook 2007

  1. Delete any items that you do not want to keep, and then empty the Deleted Items folder.
  2. On the Tools menu, click Account Settings.
  3. In the list, select Microsoft Exchange Server, and then click Change.
  4. Click More Settings.
  5. On the Advanced tab, click Offline Folder File Settings.
  6. Click Compact Now.

Method 2: Microsoft Office Outlook 2003 and earlier versions of Outlook

  1. On the Tools menu, click to select E-mail Accounts.
  2. Click View or change existing e-mail account, and then click Next.
  3. Click Microsoft Exchange Server, and then click Change.
  4. Click More Settings.
  5. On the Advanced tab, click Offline Folder File Settings.
  6. Click Compact Now.
  7. When the compact operation is finished, click OK twice.
  8. Click Next, and then click Finish.

Method 3: Microsoft Office Outlook 2010

  1. Delete any items that you do not want to keep, and then empty the Deleted Items folder.
  2. Click the File tab on the Ribbon, and then click the Info tab on the menu.
  3. Click the Accounts Settings tab, and then click Account Settings again.
  4. In the list, select Microsoft Exchange Server, and then click Change.
  5. Click More Settings.
  6. On the Advanced tab, click Offline Folder File Settings.
  7. Click Compact Now.
Microsoft Support

Friday, June 18, 2010

Turn off AutoComplete name suggesting in OUTLOOK

  1. On the Tools menu, click Options.
  2. On the Preferences tab, click E-mail Options, and then click Advanced E-mail Options.
  3. Clear the Suggest names while completing To, Cc, and Bcc fields check box.

Tuesday, June 15, 2010

How to increase Virtual Memory?

In Windows XP

  1. Click Start, and then click Control Panel.
  2. Click Performance and Maintenance, and then click System.
  3. On the Advanced tab, under Performance, click Settings.
  4. On the Advanced tab, under Virtual memory, click Change.
  5. Under Drive [Volume Label], click the drive that contains the paging file that you want to change.
  6. Under Paging file size for selected drive, click to Custom size check box. You can enter the amount of memory you would like to reserve for Virtual memory by entering the initial and maximum size.
  7. Click Set, When you are prompted to restart the computer, click Yes.
Special Note: You should choose the same amount for the initial size and maximum size. This will Stop your CPU from constantly changing the paging file.

HOT TIP: To stop your CPU from constantly changing the paging file, set the initial and maximum size to the same value. For example, 500 and 500. The value should be at least 1.5 times more than your physical RAM. If your computer has 512MB of RAM increase the virtual memory paging file to 1.5*512= 768


Monday, June 14, 2010

Recover Permanently(shift - delete) Deleted Mails in MS Outlook

Below is the procedure to recover shift deleted [permanently deleted] mails from Microsoft Outlook.

  1. First go to Run and type regedit.
  2. Go to the location: \HKEY_LOCAL_MACHINE\SOFTWARE\MICROSOFT\EXCHANGE\CLIENT\OPTIONS registry key.
  3. Right click options and add new DWORD VALUE (data type is REG_DWORD) and then right click and rename to DumpsterAlwaysOn. It is case sensitive.
  4. Then right click and modify and make the value 1 to turn the Recover Deleted Items menu choice on for all folders or enter 0 to turn it off. [I would recomend 1 for now].
  5. Update : When you modify the value, use the "Decimal" option and NOT the "Hexa-Decimal" one.
  6. Then go to Outlook , choose "Recover deleted items" option from the Tools Menu to get back your "permanently deleted" mails!
Note: This procedure can recover mails which were deleted by pressing shift+del in the past 4 days only.

jsb.blogspot.som

Friday, June 11, 2010

You do not have access to make the required system configuration modifications...'

Scenario 1: Your account does not have administrator access or are unsure if your account does

Login and install CattleMax from an administrator account on your system. If you are in a networked environment, you may need to contact your network administrator. If you are not in a networked environment, you may try logging in with another account on your system.

Scenario 2: You are logged in with an administrator account

There are inadequate permissions set to the 'HKEY_LOCAL_MACHINE\Software' and the 'HKEY_CLASSES_ROOT\CLSID' registry keys and their subkeys. You will need to modify the permissions for these keys to Allow Full Control for the Administrator, Administrators, and SYSTEM Groups.

Cattlesoft highly recommends the user consult a computer service professional before modifying the registry, as well as backing up the registry before proceeding. While we will help as best as we can, modifying the Windows Registry is done at your own risk and Cattlesoft cannot be held responsible for any mistakes in modifying the registry.

For information on modifying the registry, please visit the Microsoft help article titled "How to Modify the Windows Registry (opens in new window)"

To modify the permissions:
1. Click Start > Run. Type 'regedt32'.
2. Browse to the key/folder to be modified and highlight it.
3. Windows NT and 2000 - Click Security > Permissions.

cattlemac.com


Thursday, June 10, 2010

Creating a Personal Folder

To move items from your Outlook mailbox into a personal folder, first create a personal folder:

  1. Go to Tools, E-mail Accounts
  2. Choose View or Change Existing E-mail accounts, then click Next.
  3. Choose New Outlook Data File. A personal folder file will be the only option. Click OK.
  4. Choose a location and name for the file then click OK.
  5. Click OK again to return to the E-mail accounts window
  6. Click Finish to return to the Inbox.

The new Personal Folder will be displayed in your folder list. You can move messages or folders from your Outlook space to your local hard drive or network drive simply by dragging them from the Information Viewer onto the folder. You can add to the Personal Folder at any time in the future.

The Outlook items in the Personal Folder are available to you only when the local drive or network drive is available to you. If you use Outlook from another computer or Outlook Web Access, items in a Personal Folder are not available.


Wednesday, June 9, 2010

How to install Sql Server Management Studio

SQL Server Management Studio is a tool included with Microsoft SQL Server 2005 and later versions for configuring, managing, and administering all components within Microsoft SQL Server. The tool includes both script editors and graphical tools which work with objects and features of the server.

Some time it becomes a mystery to install Sql Server Management Studio. Normally you click setup file to install Sql Server 2005 and its components, though you have selected Client Components (Which includes Sql Server Management Studio) to install with other components, but after installation is complete, you can’t find Sql Server Management Studio in installed programs list.

No need to uninstall and re-install your whole Sql Server 2005. Leave the installed components as is and find out SqlRun_Tools setup file to execute, from following path.


Select Change Installed Components ...


Select CLIENT COMPONENTS, install in completly or you can just select Management Tools. What ever you select DON'T forget to select "Entire feature will be installed on local hard drive"


Connect SQL


Thursday, June 3, 2010

This operation has been cancelled due to restrictions in effect on this computer. Please contact your system administrator.

Error:
"This operation has been canceled due to restrictions in effect on this computer. Please contact your system administrator."

Above error appears everytime you attempt to use hyperlink in an Outlook.

Cause:
This is not an Outlook error. The most common cause is a corrupt registry key in Internet Explorer. The registry key found at
HKEY_Local_Machine\Software\Classes\htmlfile\shell\open\command
is either damaged or corrupt.

Resolution:

1 .To Reset Web settings in Windows XP:

  1. Open Internet Explorer.
  2. On the Tools menu, click Internet Options.
  3. Click the Programs tab, and then click the Reset button.
  4. Under Internet programs, verify that the correct e-mail program is selected.
  5. Click to select the Internet Explorer should check to see whether it is the default browser check box.
  6. Click Apply, and then click OK.
If you are using Vista:
  1. Open Internet Explorer.
  2. On the Tools menu, click Internet Options.
  3. Click the Advanced tab, and then click the Reset button.
  4. On the Programs tab, under Internet programs, click Set Programs, then "Set your Default Programs", select your e-mail program and click "Set this program as Default". Repeat for Internet Explorer.
  5. Click OK and close the dialogs.

Quit Microsoft Office Excel, restart the mail system, and try again

Problem:
Controls to send mail are missing or disabled or there are errors when you try to mail.

Error:
Quit Microsoft Office Excel, restart the mail system, and try again

Resolution:
Run "Microsoft Office Diagnostics" located in the "Start Menu > All Programs > Microsoft Office > Microsoft Office Tools > Microsoft Office Diagnostics".


Wednesday, May 26, 2010

Recovering Microsoft Office Outlook messages that have been removed by a hard delete

  1. Start the registry editor (regedit.exe).
  2. Navigate to the HKEY_LOCAL_MACHINE\SOFTWARE\Microsoft\Exchange\Client\Options subkey.
  3. From the Edit menu, select New and click DWORD value.
  4. Enter the name DumpsterAlwaysOn and press Enter.
  5. Double-click the new value and set it to 1. Click OK.
  6. Close the registry editor.

Monday, May 24, 2010

Lotus Notes Error: You do not have mail file specified. Use File Mobile Edit Current Location.

Resolution: Check the mail filename and mail file folder in location.
  • Click your current location (at your lower right corner).
  • Select Edit current.
  • Click the mail tab.
  • Check the filename. It should be the user’s mail database filename.

Lotus Notes Problem: Can’t forward mails.

Resolution: Check the mail filename and mail file folder in location.
  • Click your current location (at your lower right corner).
  • Select Edit current.
  • Click the mail tab.
  • Check the filename. It should be the user’s mail database filename.

Slow Lotus Notes performance

Below might help improve notes performance.
  • Delete the cache.dsk.
  • Unmark subscriptions during startup.
  • Check the Lotus Notes Client version.
  • Compact the database.